[Rust] 26. 싱글 스레드 웹서버
싱글 스레드 기반에서 작동되는 웹서버를 간단히 작성하여 테스트 해보는 시간을 갖겠습니다.
웹서버에 구동되는 주요 프로토콜은 HTTP(Hypertext Transfer Protocol) 과 TCP(Transmission Control Protocol) 입니다.
TCP 프로토콜을 통하여 네트워크 접속 및 송수신에 대한 기본적인 하위레벨로 작동되며, HTTP 가 사용되는 코드로 웹브라우저가 출력되는 방식으로 구동됩니다.
이번 시간에는 TCP를 사용하기 위해서 std::net 모듈을 이용하여 해당 모듈내에 있는 TcpListener 를 사용하여 접속 및 송수신을 작성합니다.
Tcp 연결 처리
use std::net::TcpListener;

fn main()
{
    let listener = TcpListener::bind("127.0.0.1:7878").unwrap();

    for stream in listener.incoming()
    {
        let stream = stream.unwrap();

        println!("연결 완료!");
    }
}
간단히 tcp 사용법에 대한 샘플 코드입니다. tcp 요청에 의해 접속 요청이 들어오면 "연결완료!" 메시지를 확인할 수 있습니다.
요청 데이터 읽기
이번에는 직접 브라우저로 "127.0.0.1::7878" 을 치고 접속하여 요청되는 메시지를 확인해봅니다. 메시지를 받을 버퍼를 하나 만들고 클라이언트에서 요청된 메시지를 읽어서 출력해보면 아래와 같이 나옵니다.
use std::io::prelude::*;
use std::net::TcpStream;
use std::net::TcpListener;

fn main() {
    let listener = TcpListener::bind("127.0.0.1:7878").unwrap();

    for stream in listener.incoming() {
        let stream = stream.unwrap();

        handle_connection(stream);
    }
}

fn handle_connection(mut stream: TcpStream) {
    let mut buffer = [0; 512];

    stream.read(&mut buffer).unwrap();

    println!("Request: {}", String::from_utf8_lossy(&buffer[..]));
}


// 출력 결과
Request: GET / HTTP/1.1
Host: 127.0.0.1:7878
Connection: keep-alive
Cache-Control: max-age=0
sec-ch-ua: "Google Chrome";v="111", "Not(A:Brand";v="8", "Chromium";v="111"
sec-ch-ua-mobile: ?0
sec-ch-ua-platform: "Windows"
Upgrade-Insecure-Requests: 1
...
생략
http 프로토콜은 텍스트 기반으로 데이터 전송이 이루어지며 위와 같이 요청을 한다고 볼 수 있습니다.
응답 성공 메시지 전송
여기서 우리는 서버가 클라이언트에게 데이터를 잘 받았다는 성공 메시지를 돌려줘 봅시다.
아래는 HTTP 1.1 버전의 응답 예제로서 상태코드는 200, 설명문구는 OK, 헤더와 바디는 없습니다.
HTTP/1.1 200 OK \r\n\r\n
자 그럼 이 응답 성공 메시지를 돌려주는 코드를 작성합니다.
use std::io::prelude::*;
use std::net::TcpStream;
use std::net::TcpListener;

fn main() {
    let listener = TcpListener::bind("127.0.0.1:7878").unwrap();

    for stream in listener.incoming() {
        let stream = stream.unwrap();

        handle_connection(stream);
    }
}

fn handle_connection(mut stream: TcpStream) {
    let mut buffer = [0; 512];

    stream.read(&mut buffer).unwrap();

    let response = "HTTP/1.1 200 OK\r\n\r\n";

    stream.write(response.as_bytes()).unwrap();
    stream.flush().unwrap();
}
HTML 로 응답하기
실제로 웹서버처럼 html 파일을 작성하여 응답하는 기능을 만들어 봅시다. 메모장을 열고 아래와 같이 hello.html 을 작성하여 소스파일 루트 디렉토리에 저장합니다.
hello.html

<!DOCTYPE html>
<html lang="en">
  <head>
    <meta charset="utf-8">
    <title>Hello Rust</title>
  </head>
  <body>
    <h1>Hello Rust!</h1>
    <p>This is rust web server test source.</p>
  </body>
</html>
그 다음 응답 성공 메시지 뒤에 헤더와 바디 부분을 위 html 파일로 채워서 클라이언트에게 날려주면 끝입니다.
use std::fs::File;
use std::io::prelude::*;
use std::net::TcpStream;
use std::net::TcpListener;

fn main() {
    let listener = TcpListener::bind("127.0.0.1:7878").unwrap();

    for stream in listener.incoming() {
        let stream = stream.unwrap();

        handle_connection(stream);
    }
}

fn handle_connection(mut stream: TcpStream) {
    let mut buffer = [0; 512];
    stream.read(&mut buffer).unwrap();

    let mut file = File::open("hello.html").unwrap();

    let mut contents = String::new();
    file.read_to_string(&mut contents).unwrap();

    let response = format!(
        "HTTP/1.1 200 OK\r\nContent-Length: {}\r\n\r\n{}",
        contents.len(),
        contents
    );

    stream.write(response.as_bytes()).unwrap();
    stream.flush().unwrap();
}
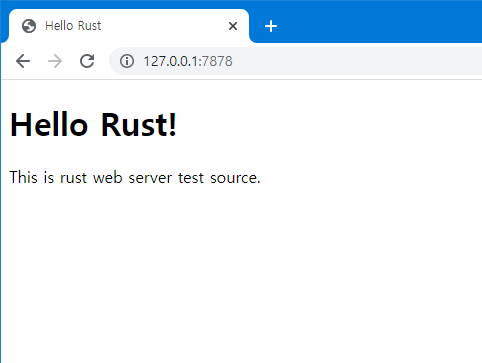
웹 브라우저를 열고 아까와 같이 127.0.0.1:7878 로 접속해보세요, 여러분이 작성한 hello.html이 브라우저에 나타날 것입니다.!

'프로그래밍 언어 > Rust' 카테고리의 다른 글
| Rust 는 c++을 대체할 수 있는가? (0) | 2025.05.09 |
|---|---|
| Rust vs C++ 차이 비교 (0) | 2025.05.09 |
| [Rust] 25. 스레드 동기화 (0) | 2023.03.24 |
| [Rust] 24. 스레드 (0) | 2023.03.14 |
| [Rust] 23. 파일 입출력 (0) | 2023.03.10 |
